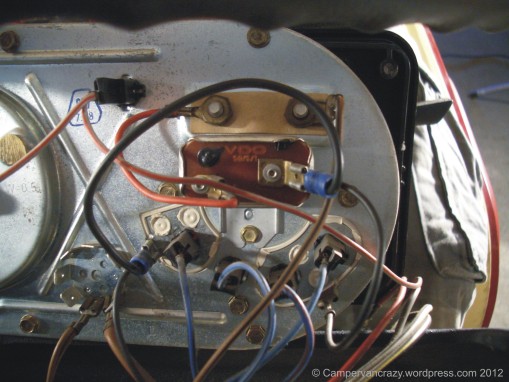
Now this is more something for me when I am not sure anymore how all the wiring looked before I took it apart. Hope it will also be useful for someone out there when they have already started disassembling things and realize too late they did not take photos before. Taking the main instrument block of the late bay out is quite easy – you loose the four screws (counter metal pieces will fall down), pull off the red and blue plastic grips of the hot and cold air, reach under the dashboard and up to the speedo and unscrew the central speedometer shaft. Then you can slowly lift the whole block up and out. I once took off the steering wheel before to have space to maneuver the instrument out more easily. But it also works with the steering wheel left in place. I took the instruments out now several times within the last year because I switched dashboards between my two buses. Interesting: Volkswagen stamped production dates on their instruments. And the one of my Old Lady, stamped 1978, fits to the car while the one from Taiga Lily is from 1979 (speedo) and 1978 (clock), respectively – several years older than the bus itself which is a 1976 model and was produced in Nov. 1975.
Campervan Crazy
Resurrecting Taiga Lily
Join 237 other subscribers
Categories
- Australian Kombis (51)
- Back benches and safety belts (1)
- Berlin VW Bus Festival (20)
- Camping (4)
- Cool Non-VW Campervans (17)
- Curtains (1)
- Fridge & Housing (1)
- Head Rests (3)
- History of the VW Bus (5)
- Lego Campervan (4)
- Other Cool Classic VWs (3)
- QEK Junior Caravan (2)
- Reflecting Contour Markings (1)
- Resurrecting Taiga Lily (114)
- Rock And Roll Bed Construction (7)
- roof rack (2)
- The Old Lady (19)
- This and that (29)
- Tow-bar (1)
- Travelling New Zealand (14)
- Uncategorized (4)
- Unusual Stuff (4)
- VW Bus accidents (2)
- VW Bus Books (2)
- VW Bus Clubs and Blogs (2)
- VW Bus Festivals (11)
- VW Bus Merchandising (17)
- VW Bus Rentals (10)
- VW Bus Repair Manuals (1)
- VW Bus Road Trips (20)
- VW Bus spare parts suppliers (1)
- VW Bus spotting (118)
- VW Bus T-Shirts (14)
- VW Buses in Advertising (5)
- VW Buses in the Media (38)
- VW Buses in the Movies (10)
Links
VW Bus and campervan related sites & blogs:
VW Bus Club pages:
Bulli Stammtisch Berlin-Brandeburg

This work by Campervancrazy is licensed under a Creative Commons Attribution-NonCommercial-ShareAlike 3.0 Germany License.


[…] the speedometer read 79810 km, but it turned out this was totally meaningless since the whole instrument unit is from April 1979, so is not the original one any more. In the 6 years we have her now, we added only 16.000 km, so […]